Easy Baked Chicken Parmesan with Juicy Chicken Thighs – Weeknight Comfort with Crispy Edges
This is the kind of dinner you make when you want big flavor without fuss. It’s classic Chicken Parmesan, but with bone-in or boneless chicken thighs for extra juiciness and tenderness. Everything happens in the oven—no deep frying, no stovetop splatter.
You still get a golden, crunchy crust, melty cheese, and a bright tomato sauce that ties it all together. It’s cozy, simple, and always a hit with family and friends.

Easy Baked Chicken Parmesan with Juicy Chicken Thighs – Weeknight Comfort with Crispy Edges
Ingredients
- 6 boneless, skinless chicken thighs (about 2 to 2.5 pounds); bone-in works too, see notes
- 1 teaspoon kosher salt, plus more to taste
- ½ teaspoon black pepper
- 1 teaspoon garlic powder
- 1 teaspoon onion powder
- 1 teaspoon dried Italian seasoning (or a mix of oregano and basil)
- 1 cup all-purpose flour
- 2 large eggs
- 1 tablespoon water
- 1 1/2 cups seasoned breadcrumbs (Italian style) or panko mixed with 1 teaspoon Italian seasoning
- ½ cup finely grated Parmesan cheese, plus more for serving
- 3 tablespoons olive oil (divided), plus extra for the pan
- 2 cups marinara sauce (store-bought or homemade)
- 8 ounces low-moisture mozzarella, sliced or shredded
- Fresh basil or parsley, chopped, for garnish (optional)
- Red pepper flakes, for heat (optional)
Instructions
- Prep the oven and pan. Heat the oven to 425°F (220°C). Line a sheet pan with foil or parchment. Set a wire rack on top if you have one. Lightly oil the surface so the breading crisps.
- Flatten slightly for even cooking. If thighs are very uneven, place between two sheets of parchment and gently pound the thickest spots until roughly uniform. Don’t make them thin—just even them out.
- Season the chicken. Pat dry. In a small bowl, mix salt, pepper, garlic powder, onion powder, and Italian seasoning. Sprinkle evenly over both sides of the thighs.
- Set up your dredging station. Put flour in one shallow bowl. Whisk eggs with 1 tablespoon water in a second. In a third, mix breadcrumbs with Parmesan. Drizzle in 1 tablespoon olive oil and toss to help the crumbs brown.
- Coat the chicken. Dredge each thigh in flour, shaking off excess. Dip in egg, then press into the breadcrumb-Parmesan mix until well coated. Place on the prepared rack or pan.
- Add a little oil. Drizzle or mist the tops with the remaining 2 tablespoons olive oil for extra crunch.
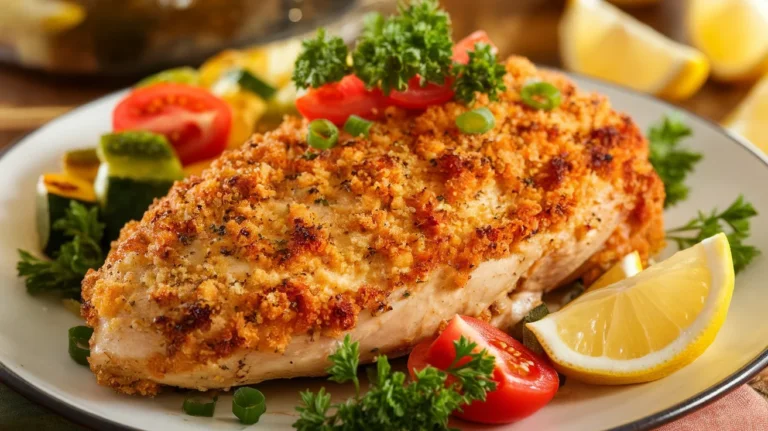
- Bake to golden. Bake for 16–20 minutes for boneless thighs (22–28 minutes if bone-in), until the coating is crisp and the internal temp is 165°F. If needed, broil for 1–2 minutes to deepen the color—watch closely.
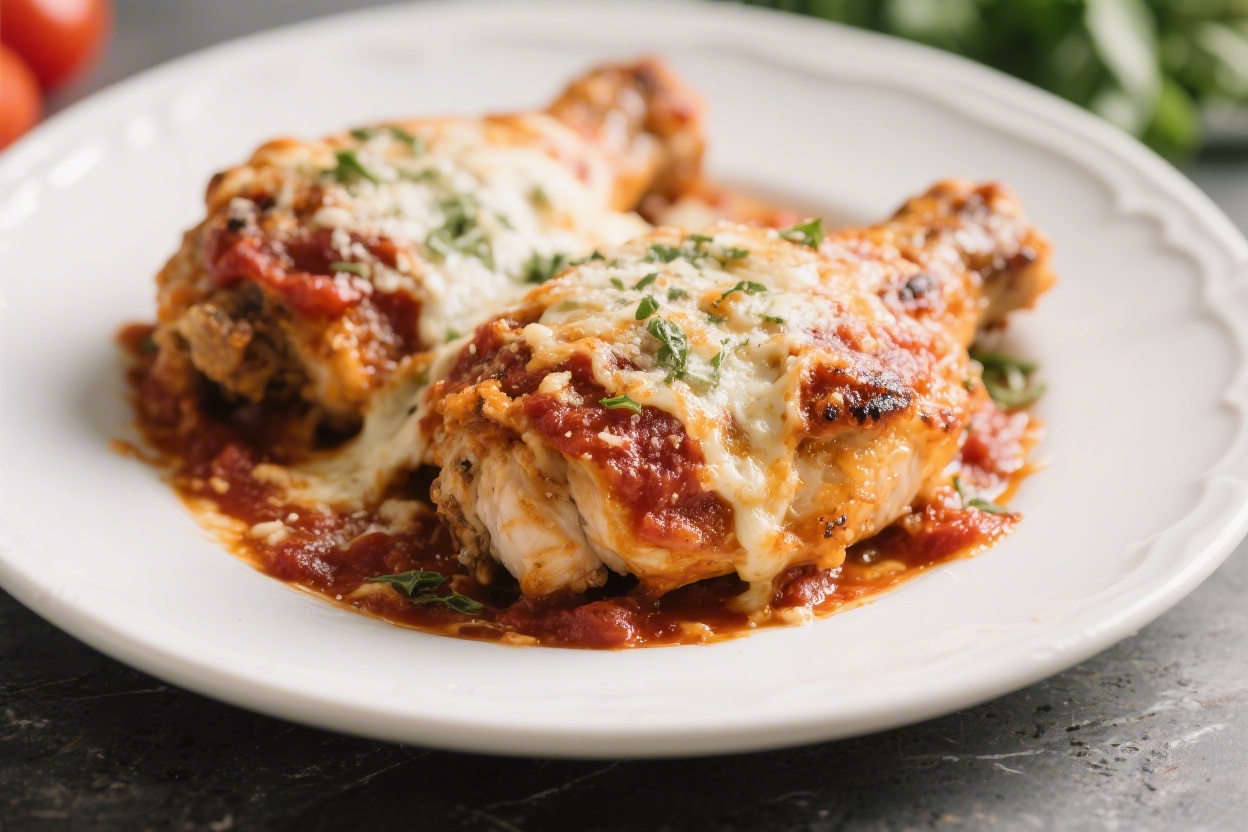
- Sauce and cheese. Spoon about 2 tablespoons marinara over each thigh. Top with mozzarella slices and a pinch of Parmesan. Return to the oven for 5–7 minutes, until the cheese melts and bubbles.
- Rest and garnish. Let the chicken rest for 3 minutes. Add fresh basil or parsley and a pinch of red pepper flakes if you like.
- Serve. Spoon extra warm marinara on the plate, set the chicken on top, and finish with a little more Parmesan. Great with spaghetti, a green salad, or roasted broccoli.
What Makes This Special
- Thighs stay juicy. Chicken thighs are forgiving and flavorful, so they don’t dry out like breasts can.
- All baked, no frying. You’ll still get a crisp crust, but with less mess and less oil.
- Balanced textures. Crunchy coating, tender chicken, gooey cheese, and a saucy finish.
- Weeknight friendly. Simple steps, pantry staples, and it reheats well.
- Make-ahead smart. Breaded thighs can chill before baking, making dinner even easier.
Ingredients
- 6 boneless, skinless chicken thighs (about 2 to 2.5 pounds); bone-in works too, see notes
- 1 teaspoon kosher salt, plus more to taste
- 1/2 teaspoon black pepper
- 1 teaspoon garlic powder
- 1 teaspoon onion powder
- 1 teaspoon dried Italian seasoning (or a mix of oregano and basil)
- 1 cup all-purpose flour
- 2 large eggs
- 1 tablespoon water
- 1 1/2 cups seasoned breadcrumbs (Italian style) or panko mixed with 1 teaspoon Italian seasoning
- 1/2 cup finely grated Parmesan cheese, plus more for serving
- 3 tablespoons olive oil (divided), plus extra for the pan
- 2 cups marinara sauce (store-bought or homemade)
- 8 ounces low-moisture mozzarella, sliced or shredded
- Fresh basil or parsley, chopped, for garnish (optional)
- Red pepper flakes, for heat (optional)
Step-by-Step Instructions
- Prep the oven and pan. Heat the oven to 425°F (220°C). Line a sheet pan with foil or parchment.
Set a wire rack on top if you have one. Lightly oil the surface so the breading crisps.
- Flatten slightly for even cooking. If thighs are very uneven, place between two sheets of parchment and gently pound the thickest spots until roughly uniform. Don’t make them thin—just even them out.
- Season the chicken. Pat dry.
In a small bowl, mix salt, pepper, garlic powder, onion powder, and Italian seasoning. Sprinkle evenly over both sides of the thighs.
- Set up your dredging station. Put flour in one shallow bowl. Whisk eggs with 1 tablespoon water in a second.
In a third, mix breadcrumbs with Parmesan. Drizzle in 1 tablespoon olive oil and toss to help the crumbs brown.
- Coat the chicken. Dredge each thigh in flour, shaking off excess. Dip in egg, then press into the breadcrumb-Parmesan mix until well coated.
Place on the prepared rack or pan.
- Add a little oil. Drizzle or mist the tops with the remaining 2 tablespoons olive oil for extra crunch.
- Bake to golden. Bake for 16–20 minutes for boneless thighs (22–28 minutes if bone-in), until the coating is crisp and the internal temp is 165°F. If needed, broil for 1–2 minutes to deepen the color—watch closely.
- Sauce and cheese. Spoon about 2 tablespoons marinara over each thigh. Top with mozzarella slices and a pinch of Parmesan.
Return to the oven for 5–7 minutes, until the cheese melts and bubbles.
- Rest and garnish. Let the chicken rest for 3 minutes. Add fresh basil or parsley and a pinch of red pepper flakes if you like.
- Serve. Spoon extra warm marinara on the plate, set the chicken on top, and finish with a little more Parmesan. Great with spaghetti, a green salad, or roasted broccoli.
Keeping It Fresh
- Store: Refrigerate leftovers in an airtight container for up to 3 days.
Keep extra sauce separate to prevent sogginess.
- Reheat: Warm in a 375°F oven or air fryer for 8–12 minutes until hot and re-crisped. Add a spoon of fresh sauce after reheating.
- Freeze: Freeze baked, unsauced, and un-cheesed breaded thighs for up to 2 months. Reheat from frozen at 400°F until hot, then add sauce and cheese to melt.
- Make-ahead: Bread the thighs up to 8 hours in advance.
Refrigerate uncovered on a rack to keep the coating dry and crisp.
Benefits of This Recipe
- High reward, low effort. Oven-baked crisp without the fuss of frying.
- Kid- and guest-friendly. Familiar flavors that please a crowd.
- Flexible and forgiving. Thighs are hard to overcook and take well to tweaks.
- Budget conscious. Thighs and pantry staples keep costs down.
- Balanced meal. Pair with a simple veg and you’ve got a complete dinner.
Pitfalls to Watch Out For
- Soggy coating: Skip placing breaded thighs directly on a bare, un-oiled pan. Use a rack if possible and drizzle with oil.
- Undercooked centers: Thigh thickness varies. Use an instant-read thermometer and target 165°F in the thickest part.
- Watery sauce pool: Don’t drown the chicken.
Use a thin layer on top and serve more on the side.
- Cheese slide-off: Add the sauce first, then cheese, so it clings. Return to the oven just until melted.
- Overcrowding: Give each piece space so hot air can circulate and crisp the crust.
Variations You Can Try
- Extra-crunch panko blend: Use half panko, half seasoned breadcrumbs for bigger crunch.
- Herb-forward: Stir lemon zest and chopped fresh parsley into the breadcrumb mix.
- Spicy arrabbiata: Add red pepper flakes to the sauce and a pinch of cayenne to the coating.
- Gluten-free: Swap flour for rice flour or cornstarch, and use gluten-free panko.
- Lighter cheese: Use part-skim mozzarella and reduce the amount by a third.
- Air fryer method: Cook breaded thighs at 375°F for 14–18 minutes (boneless), add sauce and cheese, then air fry 2–3 minutes more.
- Bone-in rustic style: Keep the bone for extra flavor. Add 5–8 minutes to the initial bake time before saucing and cheesing.
FAQ
Can I use chicken breasts instead of thighs?
Yes.
Use halved, evenly pounded chicken breasts. Bake at 425°F for 12–16 minutes until they hit 165°F, then add sauce and cheese and return to the oven to melt.
Do I need a wire rack for baking?
No, but it helps. If you don’t have one, line the pan with parchment and oil it well.
Flip the thighs halfway through the first bake for even browning.
What marinara sauce works best?
Choose a brand with simple ingredients and balanced acidity. If your sauce tastes sharp, simmer it for 5 minutes with a drizzle of olive oil and a pinch of sugar to round it out.
How do I keep the breading from falling off?
Pat the chicken dry, dredge in flour first, and press the breadcrumbs on firmly. Let the coated thighs rest on a rack for 10 minutes before baking to help the coating adhere.
Can I assemble it ahead for a party?
Yes.
Bread the thighs and refrigerate uncovered for up to 8 hours. Bake just before serving, then sauce and cheese at the end so the crust stays crisp.
What sides pair well with this?
Spaghetti or penne, garlic bread, a simple Caesar or arugula salad, roasted green beans, or sautéed zucchini all work nicely.
Is fresh mozzarella okay here?
It’s delicious but releases more moisture. If using fresh, slice it thin and blot with a paper towel before topping to avoid sogginess.
Can I reduce the oil even more?
You can, but a light drizzle is key for browning.
If you have an oil mister, a few sprays over the top give you crisp results with minimal oil.
Wrapping Up
Baked Chicken Parmesan with thighs gives you all the comfort of the classic with extra juiciness and less hassle. The steps are simple, the ingredients are familiar, and the results feel special enough for company. Keep the sauce light on top, let the cheese bubble, and bring extra marinara to the table.
It’s the kind of recipe you’ll reach for again and again—reliable, easy, and deeply satisfying. Enjoy your crispy, saucy, cheesy dinner tonight.
Printable Recipe Card
Want just the essential recipe details without scrolling through the article? Get our printable recipe card with just the ingredients and instructions.